

Solder Smoke and the Sound of Zero Talent
While other dorm rooms reeked of unwashed socks and marijuana, mine had the memorable aroma of hot solder.

Image of many vintage synthesizers via Music Gateway.
For some reason, maybe something encoded in my genes, I have never been able to play a musical instrument or read music. That doesn’t mean that I lack musical ability — I have always had a very good singing voice, had almost perfect pitch, and could pick up a song (or a part, usually tenor) after listening to it once or twice. But put a keyboard or a guitar in front of me, and my fingers and brain refuse to cooperate.
I’ve tried teaching myself keyboards and hit a brick wall. I even bought an electric guitar a few years ago, tried the Fender Play app, and found that my fingers are a bit too short to easily squeeze out chords. At this point in my life, I’ve pretty much given up. But in the early 1970s, I wanted nothing more than to do some really cool things with music.
Part of my lack of musical skill probably has to do with the fact that I’ve never taken a “real” music lesson and I stop practicing when I get to the point of diminishing returns. When I was in fifth grade, I was handed my sister’s clarinet — she was getting braces on her teeth and could no longer play the instrument, so rather than trash the investment, my folks decided that I’d like to learn to play. My elementary school “instruction” just consisted of having the band leader run us endlessly through a few simple songs so we could play a concert for our parents. All the other kids got to go to lessons on how to play their instruments and read music — I just fumbled along somehow as a self-taught clarinetist for three years.
However, I kept up the hope that someday I’d be able to play music, and when I was in high school a new sound began to make its way into the mainstream — the electronic synthesizer. The Beatles were among the early users (the Mellotron — not a true synthesizer — was used in Strawberry Fields Forever), and then musicians like Elton John and Stevie Wonder, and groups like Pink Floyd began to experiment with the instrument. Other prog rock groups like Yes and Emerson, Lake and Palmer relied heavily on synth. I loved the sounds, which were totally unlike the traditional guitar/bass/drums/keyboards sound that had dominated the 1960s.
As I was entering college in the fall of 1974, I chanced upon Snowflakes Are Dancing, classical music re-realized with synthesizers by Isao Tomita. In the spring of 1975, Kraftwerk blew my metaphorical socks off with Autobahn, an electronic extravaganza that is still worth listening to. Larry Fast’s 1975 album Synergy: Electronic Realizations for Rock Orchestra and the following year’s Sequencer were both playing constantly in my dorm rooms. I was hooked on electronic music!
When I got into college and had a few bucks saved away, I saw an ad for a synthesizer kit. I had to have one. Forget about the fact that I had no experience with electronics or kit building, or that I couldn’t play an instrument — I wanted to be able to make those amazing sounds.
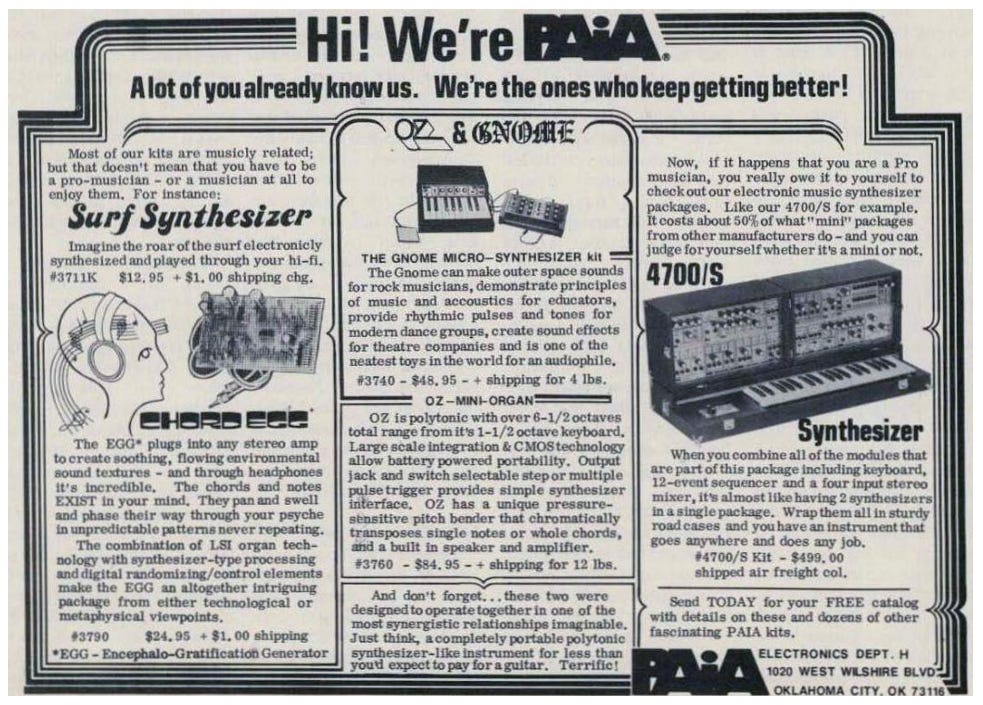
Advertisement image courtesy of Scott Lee, PAiA Electronics.
The name of the company that was selling the kit was PAiA Electronics, and they’re still in existence here in 2025! The company was founded by a man named John Simonton in 1967, when yours truly was just ten years old. They didn’t start off with synth kits; that came in 1972 with a synthesizer (the 2700) that initially didn’t have a keyboard — instead, it used pushbuttons. But considering that the 2700 cost $230 in its most basic form when “real” synthesizers by companies like Moog and ARP cost $5,000 to $10,000, it’s no wonder that struggling techie musicians were fascinated in building their own synths. One could add modules to the 2700, and they ranged in price from $50 to $800 — still a bargain compared to the commercial pre-built units.
The low prices of electronic kits was one of the reasons for their popularity. Anybody remember Heathkit? This company made a variety of electronic kits for many years. You could purchase kits to build amateur radio transceivers, oscilloscopes, TVs, stereos and amplifiers, and so on. In later years, they even made personal computer kits and a do-it-yourself robot called the HERO!
Electronic kits were a fun way to learn something about electronics — Heathkit usually included easy-to-understand explanations of how the various components worked together to perform some function.
The synth kit I became entranced with was the PAiA Model 3740 “Gnome Micro-Synthesizer”, at a price of just $48.95 (plus shipping). While I was waiting for the box to arrive at my dorm, I went to a local Radio Shack in Boulder, CO and picked up a pair of diagonal piers (wire cutters/strippers), a fine point soldering iron, a couple of 9 volt batteries, and some solder — the things I’d need to be able to build the kit. A fully constructed Gnome looked like this:
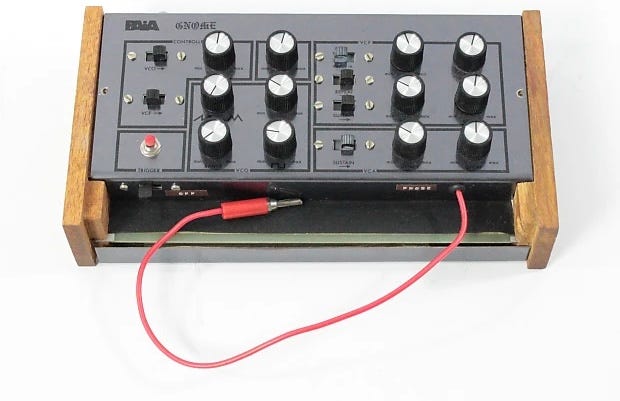
Image via Reverb.com from an advertisement for a used, non-functional PAiA Gnome.
The mental image that most of us have of a synthesizer probably goes back to Keith Emerson (Emerson, Lake, and Palmer) or Rick Wakeman of Yes sitting at a keyboard near a huge patch board with wires dangling all over the place… or one of the newer MOOG machines like this $1,899 (in 2025 dollars) Subsequent 37 Paraphonic Analog Synthesizer and MIDI keyboard:

Image via Amazon.com
So the Gnome was and is a bit of an anomaly… no keyboard, just a bunch of switches, knobs, a red button, and a weird wired dangly bit with a metal probe on the end of it. That probe was used to select the pitch of the tone you were generating from the Gnome by running up or down that black strip you see the probe resting on in the previous image.
The Gnome had three main components — a VCO (voltage controlled oscillator), a VCF (voltage controlled filter), and a VCA (voltage controlled amplifier). I won’t go into the mechanics of how all of this worked, but basically once the kit was functional you’d power it on, hook it up to an amplifier, and then start playing with different settings of the dials and switches. Here’s a link to a series of articles written by John Simonton for Radio Electronics magazine explaining how to build and use the Gnome. It’s also very informative in describing the theory behind electronic synthesizers.
As I mentioned before, I had no prior experience building any sort of electronics kits. I had done some rudimentary soldering in an electronics “shop” class in junior high school, but I wasn’t really all that sure that I would be able to build this kit. When it arrived, the Gnome consisted of a printed circuit board, some wires, a plastic bag filled with resistors, diodes, and capacitors (and a total of one integrated circuit - an “LM3900 quad current differential amp”), and the aforementioned knobs and switches. In addition, there was a sleek looking screen-printed metal control panel and a couple of wood pieces that the panel and circuit board were fastened to.


While other dorm rooms reeked of unwashed socks and marijuana, mine had the memorable aroma of hot solder. I really wanted to get this thing built quickly so I could start playing with it, so I recall spending a weekend sitting around doing nothing but soldering. There were several times I really screwed things up and put some of the components into the wrong holes, resulting in the need to unsolder the pieces and put them back in the correct location. The sole integrated circuit (IC) — that’s the black boxy-looking thing with seven little legs on each side — was a real pain to install as I kept putting on too much solder, which made connections between the pins (the “legs”). I kept removing solder and trying again — hoping all the time that I wasn’t damaging the IC. Eventually everything looked like it was in the proper place.
The next thing to do was to install a couple of 9V batteries (the type used in transistor radios), run a cable from the Gnome to the aux input jack on my all-in-one stereo (hey, I was living in a dorm and there wasn’t a lot of room), and go through the testing and calibration process outlined in the manual. To my surprise, everything worked! By the way, if you want to see that manual, head to this page on the PAiA website and click on the links in the forum.
Well, now I had something I could make really wild sounds with… but that was about it. I amazed my roommates, made the other people on the same dorm floor wonder what the hell those noises were, and when I hooked up headphones to my stereo and wiggled the left/right balance knob while doing some synthing, I could even mimic stuff I heard on some of my growing collection of electronic music albums. I had the feeling that I needed to add a keyboard to the mix…
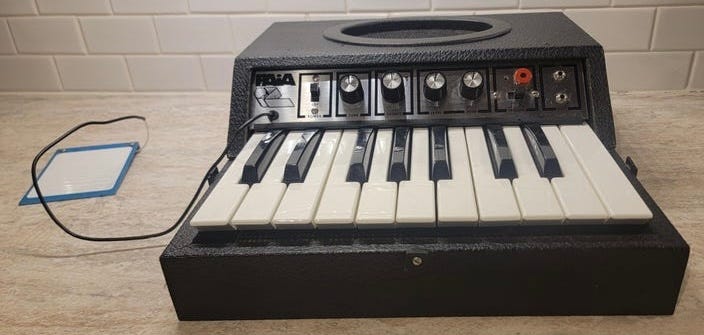
PAiA Oz Mini-Organ. Image via “inbetweengigs” on Etsy.
And along came the PAiA Model 3760 Oz Mini-Organ, which was designed to work with the Gnome… provided you made a slight modification to the Gnome so it would receive the output from the Oz. I was making a bit more money at my college jobs at this point, so shelling out $84.95 plus the obligatory shipping fee was no problem. I think this came out in 1976, and I was busy falling in love with my wife of 46 years at that point, so it rather surprises me that I had the time or interest to build it.
Compared to the Gnome, I thought building the Oz was a piece of cake. PAiA still has the instruction manual for the Oz hanging around online… A couple of interesting things about this keyboard. First, it had only 18 keys compared to the usual 88 on a “real” piano keyboard. However, the second knob from the left allowed you to switch between octaves (from 1 to 5) so you could create a complete range of tones from growly lows to tweeting highs. The second cool thing was a pitch bender, which would change the pitch of the sound being played as you applied pressure to it.
Most modern electronic keyboards use a pitch wheel rather than the resistive pitch bender used by the Oz. To be honest, I always felt the pitch bender was a bit useless as it required a LOT of pressure to achieve even a little bit of change in pitch.
There was one more problem. Even with just 18 keys, I couldn’t play much on the keyboard. My lack of coordination hit again, so the Gnome and the Oz started to collect dust. Now, I’m not one to let unused things just sit around; there’s something in my genetic makeup that tries to sell old items, which is probably why I don’t have a stack of 50 or 60 used Macs sitting around in my house. In my senior year of university studies, I decided to sell the musical duo of Gnome and Oz so I put an ad in the campus rag (The Colorado Daily) and managed to sell it to an actual musician for the huge sum of $130 (don’t ask me why I remember that figure…). I hope he got some use out of it!
That ended my fun with building musical instruments, but not the end of building kits. I built a couple of calculator kits, and I also helped a college friend of mine build a MITS Altair 8800 computer. I’ll talk about both of these kit building adventures in future LifeBits articles.
Writing these LifeBits memories also ignited a need in my deepest soul to start doing some modern-day kit building and programming, so I recently ordered a Clockwork Pi PicoCalc, which is a fully-functional computer the size of a calculator that runs on a Raspberry Pi PicoCalc 1H microcontroller. Compared to the Gnome and Oz, this is a snap to put together — no soldering required! I still don’t know what I’ll do with the PicoCalc, but that’s half the fun of being a nerd.
Did you enjoy this retro journey into the electronic synth kit world in the 1970s? If you did, consider subscribing to LifeBits for free and you’ll get the latest articles as soon as they flow out of my brain and onto the digital page. Really like what you’ve been reading? Become a paying subscriber and get my undying thanks for your support!
Until next time… go listen to some of those synth classics of the 1970s!